
How to Sew sleeve Cuff in CLO 3D with a step-by-step Guide Images


This this blog, you will learn how to sew and construct the perfect sleeve cuffs in Clo3D. This includes a step-by-step guide on how to fold the pleats, sew the plackets, and finally, attach the sleeves to the sleeve cuffs.

Step 1: How to Fold a Pleat in CLO3D

Late Update: 

Use the Pleats Fold Tool:
  • Knife Pleats
  • Number of Internal Lines per Pleat: 3
  • Fold Angle: 0-360
  • Outside Fold: 0
  • Inside Fold: 360
Tips: Make sure to strengthen the sleeve first by right-clicking on the sleeve in the 3D window and selecting "Strengthen."
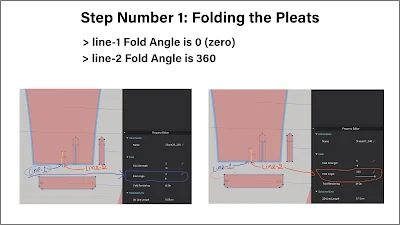
To fold the pleats, click on "Line-1" in the Property Editor and set the Fold Angle to 0 (zero). Then, move to "Line-2" in the Property Editor and also set the Fold Angle to 360. Note: leave the "Fold Strength" as default, which is 5. After that, press the space bar to simulate and activate the fold effect. Please refer to the guideline photo.

Step 2: How to Sew Pleats

To sew the pleats, use the Free Sewing tool. Go to the Free Sewing Tool in the 2D Toolbar and click on it to select. Start sewing from "Line-2" (see the guideline photo below) by clicking once to start, then hover your mouse to the right until you reach the baseline. Click once to place the sewing. Next, click once again on "Line-2," but this time, hover the mouse to the left until you reach "Line-1." Click once to place the sewing.
While the Free Sewing Tool is still active, click on "Line-1" to begin the sewing and hover the mouse to the right until you reach "Line-2," then click once to place the sewing. Next, click on "Line-1" again, but this time, hover your mouse to the left until you see a blue ball appear. This means that you can click once to place the sewing. After the sewing, press the space bar to simulate.
If the sewing is not flat, it may be twisted. If that happens, use the Edit Sewing Tool. Click on it to select, then click on the sewing and right-click to reverse the sewing or use the command/control + letter b.

How to Change the Sewing Line to Turned

While the Edit Sewing Tool is still active, click on the “pleat sewing” > Property Editor > Sewing Line Type: select Turned (apply Turned to both sewings).

Step 3: How to Sew a Placket onto a Sleeve

Tips: Ensure all the sewing notches are parallel to each other.

Go to the Segment Sewing Tool, and click once to select. Begin sewing with this internal placket. Click once to place the sewing. Next, sew it to this placket pattern. Please refer to the guideline photo from 1 through 6.

Step 4: How to Sew the Sleeve to the Cuff

To sew the sleeve cuff in Clo3D, use the Free Sewing Tool.
Please, see the phos guide below: Go to the Free Sewing Tool, click once to select. Then, start sewing the cuff pattern (labeled number 1) click on it to start, follow the arrow, and then click on this placket (labeled number 2). Repeat this step for numbers 3, 4, and finally 5. After that, refer to the guideline photo below.

There you have it. Please, see a discount pattern link here for practice
Thank you for watching, Designistas! Have fun, and remember to subscribe to Encoder Fashion and click on the bell for more awesome videos!

Comments

Popular posts from this blog

How to Change Avatar Size in CLO 3D Easy Step-by-step

How to Change the Avatar’s Size in CLO3D step by step video By the end of this video, you will know how to change your Avatar’s size, save it for your future use, and import it back into your clo-workspace quick and easily in CLO3D. To Change the Avatar’s Size in CLO3D Selecting the Avatar: go to Library Panel and under Favorites select Avatar double click on it to open the folders. After you open the folders below here under the Library Panel you will see many folders. Double click on the Female_V1 folder to open. Next, hover your mouse over the Avatar called FV1_Kelly.avt and double click on her to open. How to Open Avatar Editor Window: while the Avatar is still open, to the menu and select Avatar, click on it to open the menu and select the Avatar Editor. Then, the Avatar Editor window pops up. How to Change the Avatar’s Size: the Avatar Editor window has three menus. These are included the Avatar Size, Measure, and Arrangement. In this video, we only need to focus on one menu whic...

How to Change the Avatar Size quick and easy with grading rule for clo 3d

When it comes to customizing avatars it is not everyone a cup of tea, however, with clo3d 6.1 it has never been easier. Changing the avatar size is the first step of grading a garment in clo3d. After, changing the avatar sizes, let the computer does the grading for you. Here is an easy step-by-step changing the avatar size as well as some grade rules for women’s and petite sizes charts. Hope you find this article helpful. Encoder Fashion Women’s Sizes Chart/Grade Rule for CLO3D Grading Rule | Size Chart for CLO3D from XS-XL in CM/IN | Encoder Fashion Women’s Size Chart for  CLO3D Encoder Fashion Petite Size Chart | Grade Rules for CLO3D Encoder Fashion petite size chart | grade rules 5 sizes from xs to xl in IN|CM Important Note:  1 in / 2.5 cm up-size for the “Total Height.” How to Change the Avatar Size | CLO3D Quick and efficient ways to change the avatar size in clo3d. Changing the sizes of the avatar has never been easier. You only need 4 measurements to make it work. See...

How to Sew and Construct a Woman Blazer with Shoulder Pads and Lining in CLO 3D

Hello, Designistas! In this video, I will demonstrate the quickest and easiest way to construct a blazer with shoulder pads and linings in Clo 3D. To clarify any confusion, I've also provided you with step-by-step guidelines here below. Step 1: How to Prepare the Shell for Sewing a Blazer Remove everything except 1/2 of the patterns. Place the pattern onto the avatar. Sew the pattern. Make a copy using symmetry with sewing. Apply folds to lapels (fold strength: 5, fold angle: 360, fold rendering: on). Hems and sleeves: (fold strength: 5, fold angle: 0, fold rendering: on). Sew all the hems. Simulate and check the internal lines. Apply the fabrics (wool cashmere). Remove the front sewing. Sew the buttonhole (width: 3.5), and button (width: 3). Fasten the buttons. Change the button/buttonhole color to pink. Sew shoulder pads. Sew the pockets. Make a fabric copy and apply that to pockets (change the color to slightly darker). Step 2: How to Prepare the Lining for Sewing a Blazer Make ...