
For more Full Pattern Courses, Join a YouTube Member
 |
| Click on a link here to connect to YouTube |

Things You Should Know
- To effectively engage in this course, keep the following points in mind:
- Basic Understanding of clo3d Software:
- You should possess a fundamental grasp of the clo3d software.
- No Drafting Pattern Skills Required:
- This course does not demand any prior drafting pattern skills.
- Provided Skirt Measurements:
- The instructor will provide the measurements for the skirt.
- Simple Drafting Method for Clo3d Patterns:
- You will learn how to create patterns in clo3d using a straightforward drafting approach.
- Step-by-Step Hands-On Pattern-Making Course: This course offers a comprehensive, step-by-step guide to pattern-making through practical experience.
Skirt Measurements:
- Skirt Length: 53 cm
- Skirt Waist Circumference: 17.47 cm
- Skirt Hip Circumference: 20.96
- Skirt Hem Circumference: 31.27 cm
Highlights of the Course:
Step-by-step image guides will assist you through the process. Let's dive into the steps:
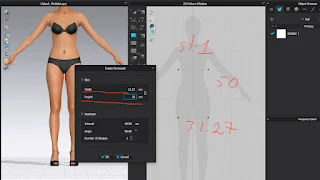
Step 1: Creating the Fabric
- Set the fabric dimensions: Width - 31.27, Height - 50.

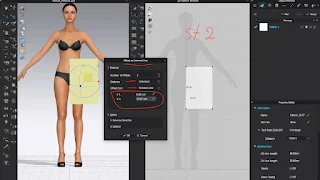
Step 2: Establishing Internal Lines from the Center
- Create 2 internal lines from the center.
- The first line should be at a distance of 8 cm, and the second line at 17.47 cm.

Step 3: Crafting Internal Lines from the Top
- Generate 3 internal lines from the top.
- The distances for these lines are 1st line - 1.5 cm, 2nd line - 12 cm, and 3rd line - 16 cm.

Step 4: Introducing an Internal Line from the Bottom
- Add 1 internal line from the bottom with a distance of 2.5 cm.

Step 5: Create a Line Shape and Skirt Hem Curve
- Draw a line shape and establish a curve for the skirt hem.

Step 6: Tracing the A-Line Skirt Shape
- Trace the A-line skirt shape to create a pattern.

Step 7: Adding Points on the Dart Line
- Use the Extend/Trim and Add Point to Pattern Outline Function to place points on the dart line.

Step 8: Refining the Pattern
- Lock the pattern outline.
- Convert all internal lines to baselines.
- Lock all the baselines.
- Unlock the pattern outline.
- Add a dart on the dart point using the right-click function: Dart Dimension - 2, Dart Length - 10.

Step 9: Creating a Waist Curve
- Craft a waist curve by drawing a curved line on the waist and cutting.

Step 10: Dart Length Adjustment
- Adjust the dart length using the Edit Pattern tool, referring to the image.

Step 11: Waistband Measurement and Fabrication
- Use the Edit Pattern Tool to measure the waistband by selecting both waistlines.

Step 11.1: Waistband Measurement and Fabrication
- Fabricate a fabric for the waistband with dimensions: Width - 15.76 cm, Height - 6 cm.

Step 11.2: Establishing Internal Lines from the Top
- Create internal lines from the top at a distance of 1.25 cm.

Step 11.3: Crafting Internal Lines from the Side Seam
- Generate internal lines from the side seam at a distance of 0.7 cm.

Step 11.4: Drawing a Curved Line
- Draw a curved line from the center to the side seam.

Step 11.5: Waistline Adjustments and Waistband Creation
- Cut the waistline.
- Offset the waistline by 3 cm.
- Draw the waistband shape.
- Cut the waistband.

Step 12: Replicating Waistband and Skirt Block Patterns
- Create copies of the waistband and skirt block patterns.

Step 13: Pattern Refinement and Zipper Notch
- Refine the pattern and incorporate a zipper notch.

By following these clear and precise steps, you'll gain valuable insights into pattern-making using the clo3d software.
Please these video links for clo 3d beginner courses listed below:
- Part 1 Beginners CLO 3D Course for Pattern Making
- Part 2 Beginners CLO 3D Course for Pattern Making
- Part 3 Beginners CLO 3D Course for Pattern Making
- Part 4 Beginners CLO 3D Course for Pattern Making
Comments
Post a Comment
Please share your thoughts! No spam or links — let’s keep it helpful for everyone. 💛